Deadites Online Message Forums
August 20, 2008, 09:36:24 PM*

Welcome, Guest. Please login or register.

Login with username, password and session length
News:
Advanced search  
Pages: [1]
Print
Author Topic: Intro to Lighting: Technique, Equipment, Etc!  (Read 805 times)
Westcroft
Deadite
***
Posts: 208


That guy who makes movies


View Profile
« on: February 04, 2008, 12:19:36 AM »

Lighting is important, lighting can reveal something about a character in your movie or it can actually be another character in your movie... It has the ability to make your movie viewable (literally and figuratively) but without it, then your movie lacks the shine of something that took time and can be added to the loads of videos on YouTube.

Here's another quick tutorial, this time for lighting. It's just a basic overview, please add to this and if anyone wants I'll make a more in depth version sometime in the future.

To start off one should have a basic understanding of the three point lighting set-up. If you don't, here is a website with the basics (http://www.mediacollege.com/lighting/three-point).

Of course three point lighting, although it is the most basic lighting approach, it can be simplified further to reduce the amount of lights required. To show this I have gathered some parts of a slideshow that I found on the web (NOTE: These are not mine).


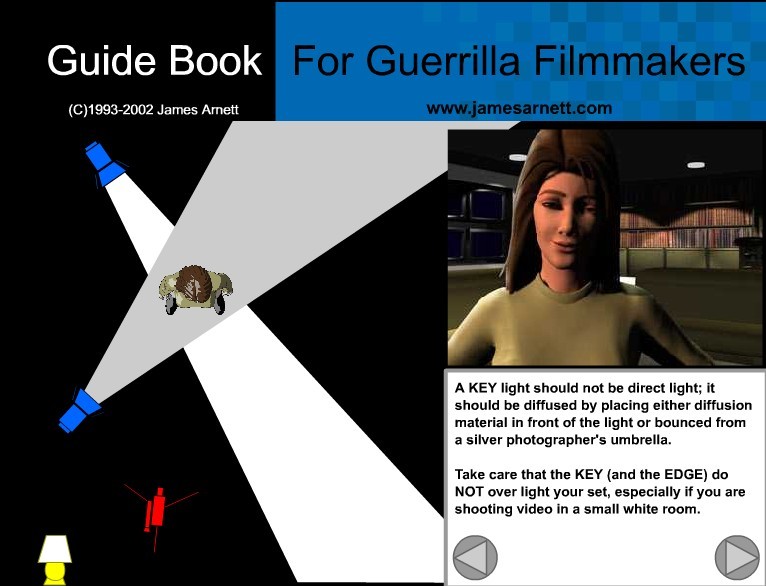
Instead of using your average three lights you use only TWO lights plus a Reflector (AKA Bounce Pad) to replace the 'Fill' light.

A great thing to have with you is Bounce Pads.


They can substitute for lights and reduce the amount of things in your Light Kit. Speaking of light kits, let’s go over a list of things that are in the essential guerrilla filmmakers light kit. As you can tell it's not terribly hard to find a DIY solution... one of those windshield light blockers that people put in their cars to keep their seats cool in the summer could work... or making a balsa wood frame, covering it with a thin material and then putting gold leafing (or silver leafing) on it... but back to the light kit.

LIGHT KIT:

i) Clamp Lights


These are the fundamental (and sometimes the only) lights in a indie light kit. Sure you can have three of these and go for the three point lighting approach, but these lights have little control and there's no room for any modifications. Thus you can't have anything but the average lighting and sometimes even that is next to impossible. The lights can wash out the actors and lead to other problems.

Although with the right approach it can still be used.

For example: The key light can have a 100w bulb in it. The Fill light can be a 60w bulb, or a 100w bulb facing away from the actor into an umbrella painted with glossy white paint (DIY photography umbrella Tongue). The Edge light can be a 100w bulb as well.

But if you want to not be so limited, I suggest getting a few more components.

ii) Chinese Paper Lanterns


These bad boys are my favourite part of the lighting kit, mainly because they look cool, but also because they're so useful.

These are great for lighting the background or set with diffused light and if you're using a 60w bulb for the "Edge" light, then the lanterns can assist. They can also replace the Fill light for it's a great source of diffused light. I recommend using CFL bulbs for they don't get as hot and also save energy.

iii) Work Lights


We all have seen these at Home Depot or even Wal Mart for as low as $35, although they can't be used for much on their own, with the right mind set these babies can really shine... pun intended. Try making some DIY French flags for the lights, or a plywood box to go around the lights to allow filters or gels to be used (be careful though... some work lights may be too strong and just be a fire hazard).

Try to recreate something like this:


An example of gels is something like this:


iv) White LED Christmas Lights


These might seem odd to use, but they produce the very best light (less green then fluorescent and less orange than Incandescent). I usually tape garbage bags to my windows, attach the lights over the garbage bags then some curtains to diffuse the lights. This is a great way to recreate daylight for interior shots that you want to shoot at night (this widens your shooting schedule).

---------------------------------------------------------

Here is something to be aware of:

Fluorescent Lighting. Unless you can spend the big dollars and get the Kino Flo Fluorescent lights** that don't flicker and when put closed to another one, don't get hot enough to scald a child to death, then I suggest to stay away from them, unless they're in the scene... in which case, you can play them up more so (color correct and add green tint to give a dirty feel).

** Kino Flo Flurescent Light


---------------------------------------------------------

An example of using the power of lighting is Chiaroscuro (my favorite lighting style), it's using bold light contrasted (usually evenly) with darkness. This is how you can get away with using an incomplete lightset... say your mistakes were done on purpose Tongue


---------------------------------------------------------

The power of technology basically reduces lightning to just try and make everything that is meant to be seen, seen. Once everything is lit properly then objects of focus in the scene (ex. actors, an object that is important, etc) are seen clearly and thus making it easier for the audience to WATCH the movie.

Lightmeters*** and such are a handy tool to try and recreate the same lighting shot to shot, but now we have handy dandy software that we can color correct and match scenes, there isn't so much stress put on trying to recreate the exact same environment shot to shot... this makes things easier. (Note: You still want similar lighting shot to shot, because no matter how good your software is you'll be stuck if one shot is washed out with light and the other is a blackout).

*** An example of a Light meter (this one is UBER expensive)


« Last Edit: February 04, 2008, 12:27:26 AM by Westcroft » Logged

I am a Virus, I live in Silence.
Your Mothers Boomstick
Deadite
***
Posts: 118


View Profile
« Reply #1 on: February 04, 2008, 01:42:10 AM »

very good tutorial, but what if you have a big overhead light, will that provide enough lighting for a scene taking place in a small room?
« Last Edit: February 04, 2008, 01:47:28 PM by Your Mothers Boomstick » Logged
Westcroft
Deadite
***
Posts: 208


That guy who makes movies


View Profile
« Reply #2 on: February 04, 2008, 03:11:43 PM »

That would be good for lighting the setting, but I would say getting a few lights to place on your actors would be a great way to help them stand out.
Logged

I am a Virus, I live in Silence.
Your Mothers Boomstick
Deadite
***
Posts: 118


View Profile
« Reply #3 on: February 05, 2008, 02:14:59 PM »

kool. now in an already well lit area where you just want to remove a shadow because you are at a closeup of the side of an actor (side of face), would you still use the aformentioned lights or switch to something like a flashlight for instance
Logged
Westcroft
Deadite
***
Posts: 208


That guy who makes movies


View Profile
« Reply #4 on: February 05, 2008, 03:29:52 PM »

kool. now in an already well lit area where you just want to remove a shadow because you are at a closeup of the side of an actor (side of face), would you still use the aformentioned lights or switch to something like a flashlight for instance

I would probably stick to a clamp light with a low wattage bulb aiming at the actors face, then having a bounce pad in the opposite direction, to bounce the light on the other side of the actor's face... then if there are harsh shadows caused by the bounce pad, then use your flashlight... I would suggest holding a thin sheet or pillow case over the flashlight to diffuse the light so it doesn't wash out the actor with light.

Here's a picture to help explain what I mean... sorry for the crappy quality, I did it in paint.

Logged

I am a Virus, I live in Silence.
Your Mothers Boomstick
Deadite
***
Posts: 118


View Profile
« Reply #5 on: February 05, 2008, 03:48:23 PM »

actually its my bad, i didn't rally explain myself


the black is a wall and the white space in the black is a door. the arrow is a camera, and the red are my actors, facing each other and up against the wall. so as you can see the camera is facing the side of my actor's face, but at an odd angle from the back, so how would i light this?
Logged
Westcroft
Deadite
***
Posts: 208


That guy who makes movies


View Profile
« Reply #6 on: February 05, 2008, 04:49:32 PM »

i would probably go with this.

Logged

I am a Virus, I live in Silence.
Your Mothers Boomstick
Deadite
***
Posts: 118


View Profile
« Reply #7 on: February 05, 2008, 04:57:20 PM »

kool thx bud, now a question regarding the bouncepad, i have a mirror right about where that pad is, could i simply use the mirror as a bouncepad?
« Last Edit: February 05, 2008, 04:59:37 PM by Your Mothers Boomstick » Logged
Westcroft
Deadite
***
Posts: 208


That guy who makes movies


View Profile
« Reply #8 on: February 05, 2008, 07:18:58 PM »

I think a mirror might not be the best thing to use... I would just get some cardboard and tin foil and use that... You can try using a mirror, but I think it might not work... I believe it doesn't really diffuse the light and it'll just end up being very "spotlight"ish in the reflection.

give it a whirl though!
Logged

I am a Virus, I live in Silence.
Your Mothers Boomstick
Deadite
***
Posts: 118


View Profile
« Reply #9 on: February 06, 2008, 02:02:48 AM »

kool, although cardboard n tin foil seems much easier as i can aim it freely and it doesn't take as much to make as that plywood contraption you mentioned earlier
Logged
Westcroft
Deadite
***
Posts: 208


That guy who makes movies


View Profile
« Reply #10 on: February 06, 2008, 03:39:11 AM »

A hula hoop with a sheet of cotton taped to it... then spray paint it silver or add gold flaking.

that'd be the more advanced way to do it.

Best of luck with the shoot! If you have any more lighting problems, most em and I'll try to help!
Logged

I am a Virus, I live in Silence.
Westcroft
Deadite
***
Posts: 208


That guy who makes movies


View Profile
« Reply #11 on: February 06, 2008, 04:02:15 AM »

To everyone,

Here's an example of how color correction can effect a film.


Now notice with some color correction we can change the atmosphere and mood.

« Last Edit: February 06, 2008, 04:04:04 AM by Westcroft » Logged

I am a Virus, I live in Silence.
Your Mothers Boomstick
Deadite
***
Posts: 118


View Profile
« Reply #12 on: February 06, 2008, 03:07:36 PM »

second has a sickly color to it, similar to those seen in bleak hospitals and, more importantly, mental asylums. thus, this gives the background allot more eeary feel
Logged
Westcroft
Deadite
***
Posts: 208


That guy who makes movies


View Profile
« Reply #13 on: February 06, 2008, 11:45:23 PM »

here's another example of how color correction can work for you... darkening things to give it an eerie look is one thing, but you can also make things more vivid and make your shots of agriculture or anything more epic. I found this picture of a forest and decided to run it through a similar color correction I used for a scene I filmed in a neighbouring forest.

BEFORE


AFTER

Logged

I am a Virus, I live in Silence.
Pages: [1]
Print
Jump to:  

 Deadites Online V.1.0 by Kain Powered by SMF 1.1.4 | SMF © 2006-2007, Simple Machines LLC MySQL | PHP | XHTML | CSS